


So, what exactly do we mean when we’re talking about descaling Nespresso machines like the Nespresso VertuoLine or the Evoluo? Well, to put it simply, descaling is a process that removes any traces of deposits that have been left behind by repeated coffee brewing (usually over a prolonged period).
Descaling Nespresso VertuoLine components is important because if left unattended, the aforementioned residue has the power to negatively influence the flavor and quality of your coffee.
So, with all of that being said, here are the steps that you should follow to properly descale a Nespresso VertuoLine.
1. Preliminary Cleaning of the Nespresso Vertuoline
This initial step is a no-brainer and can technically be considered as a prelude to the actual descaling process. Before you do anything else, you will first need to clear out any remnants of previous use from the coffee maker.
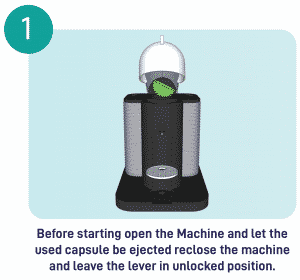
Simply open the VertuoLine’s lid and this will automatically eject the last used coffee capsule in the capsule container. Once this is done, make sure that the lid is closed and also that the lever is left in the unlocked position.
Next, remove the capsule tank, the drip tray, the water tank, and the cup support, and then empty them of their contents.
One optional (but highly recommended) step that you can take here is to give all of these parts a quick rinse with clean water before you put them back into their designated slots.
2. Prepare the Descaling Solution
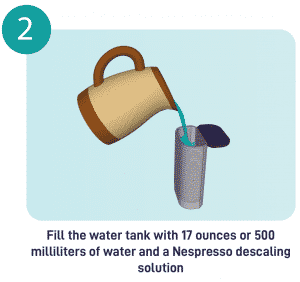
Next, pour 500 ml (0.5l/17oz.) of clean water into your VertuoLine’s water tank. Take out one of the descaling solution sachets from the kit, carefully cut it open, and then empty all of its contents into the water.
If your coffee maker has been purchased through the Nespresso Club, it should have already come with a descaling kit. However, if you aren’t a member of the Nespresso Club, it is fairly easy to buy the kits online.

3. Switch to Descale Mode
Next – once you’ve made sure that your VertuoLine is connected to a steady power supply – press the power button at the top to activate the device.
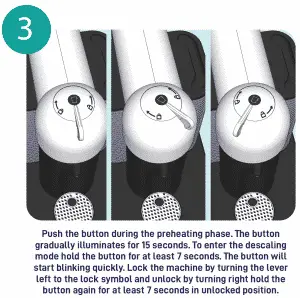
The VertuoLine will start to preheat the water for about 15 seconds, which will be indicated by the power light blinking. Once the light stops blinking, hold down the power button for 7 seconds so that the device switches to descaling mode.
Now, you have approximately 45s to complete the following actions:
- Lock the lid by turning the lever to the left once.
- Unlock the lid by reversing the lever to the right (i.e. towards the unlock icon).
- Then, once more, press and hold the power button for 7s.
- Place a cup or mug under the coffee outlet. This cup or mug must be large enough to contain all the water (500 ml) that you’ve poured into the VertuoLine’s tank.
4. Begin the Descaling Process
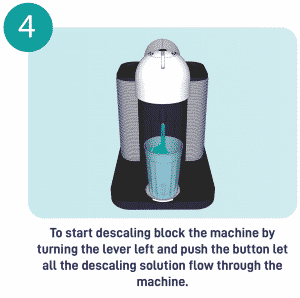
Now we’re finally ready to start descaling the Nespresso VertuoLine. Lock the lid, by turning the lever to the left towards the lock icon, and then press the power button to start the descaling process.
This step is completely automatic and after a few moments, the VertuoLine will start pouring the descaling solution through the nozzle and into the cup until its tank is completely empty.
5. Repeat Once Again
This step is technically optional but it is highly recommended if you want to get the best results.
Take the cup of descaling solution and pour it once more into the water tank, then repeat steps 3 and 4.
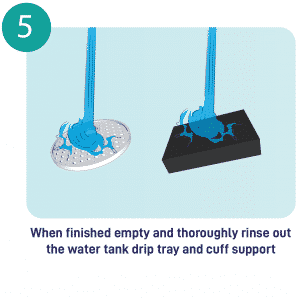
6. Clean All of the Removable Articles
Once the descaling is complete, remove the water tank, the solution-filled cup, the drip tray, and the cup support.
Empty all of these containers and thoroughly wash them with clean water (preferably warm water) to remove any remnants of the descaling solution.
Next, lightly shake off and towel dry these components to remove excess water and then put them back in their original positions.
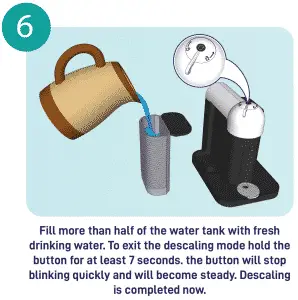
7. Rinse Out the VertuoLine
Place the cup on the drip tray once more and then fill the water tank up to more than half of its volume with fresh-clean drinking water. Now, press the power button to start the internal rinsing process.
Your VertuoLine will automatically stop once it is done running this water through its system and dispensing it.
This step only needs to be performed once but if you want to be safe you can repeat it as many times as you’d like to ensure that all of the residues are completely removed. Just make sure that you use fresh drinking water (instead of recycling the used water) each time that you repeat this step.
8. Turn off the Descale Mode
Now that you’re all done, the last thing that you need to do is to switch your VertuoLine back to its coffee brewing ways.
To turn off the descaling mode, simply press and hold the power button for about 7 seconds. Once the power light has stopped blinking, your VertuoLine has exited descaling mode and you are good to go!
If you want to err on the side of caution, it is also recommended that you let your VertuoLine dry and rest for about 10 to 15 minutes.
Final Words
All in all, descaling Nespresso VertuoLine components takes about 20 minutes and ideally needs to be done every 3 to 6 months.
However, that being said, you ideally shouldn’t need to keep track of this time frame because your VertuoLine will automatically notify you (through its LED interface) when it needs to be descaled.

2 thoughts on “How to Descale Nespresso Vertuoline: Step-by-Step Cleaning Guide”
What position must the Power Button be, ‘Locked’ or ‘Unlocked’ when pressed to rinse out the system after descaling?
What position must the Power Button be, ‘Locked’ or ‘Unlocked’ to turn off Descaling Mode?
Thank you for your descaling instructions for the Nespresso VirtuoLine Evoluo Coffee Machine!
It must be in the locked position to turn off descaling mode. We have also updated the post, thank you!